|
|
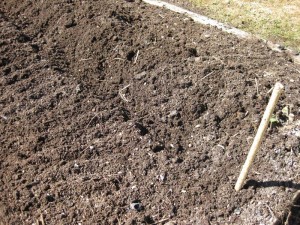 Crumbly soil, ready to be planted. With daytime temps hitting 60 degrees and an amazing stretch of sunny days, it was clearly time to plant in the bed that has been drying out for the past week. I simply removed the plastic, raked the beds and planted seeds, then covered the bed with a floating row cover.  Unlike plastic covers or cold frames that require venting on sunny days and hand watering, row covers are permeable, allowing rain and air to penetrate, insulating plats when it’s cold and releasing heat when it gets hot.
Early planting, as noted in previous posts is all about getting the ground thawed and the soil dried out. If you try to rake or till when the soil is wet, it will compact and plants won’t be happy. Soil is ready when it crumbles easily in your hand after squeezing and doesn’t make your hand wet. Note that the more organic matter in the soil, the more crumbly it will be. That means you’ll be able to work the soil earlier if you add compost in the fall.Â
In my 4 x 12′ bed, seeds were planted for a number of cold-hardy vegetables . Some will last until next winter like the multi-colored Bright Lights chard.  Some will be consumed in the next month or two – radish, arugula, lettuce, spinach, and broccoli raab.  Others will be ready to harvest in June – snow peas, radicchio, nappa cabbage and bok choi. As each wave of vegetables is harvested, others will be planted to fill the space.
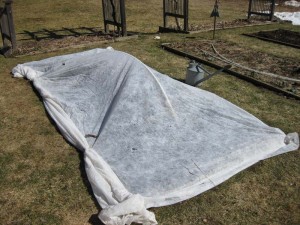 Spun polyester row covers make season extending easy. 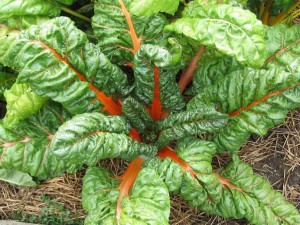 Last year's chard. I’ve learned to not to plant greens that are heat sensitive, like raab and chinese cabbage, in the hoop house at this time of year, since daytime temperatures on sunny days will stress them and cause them to bolt prematurely. That’s why I like to plant them early outside, where cold hardy plants can grow happily for the next few months in the cool temperatures they prefer.
Â
 Celeriac, the homely prince of root vegetables A favorite dish at this time of year features the last of the celeriac stored the root cellar. And in a bit of poetic symetry it’s also time to plant the next season’s celeriac seeds. Each year I grow more of this lovely winter vegetable. It’s hardy, isn’t bothered by pests (except voles!), doesn’t take up much space in the garden though it needs the entire season to grow, and stores beautifully in the root cellar. Â
Contrary to it’s gnarly appearance, this is a highly refined root vegetable with a gentle, slightly celery-like flavor that enhances so many winter dishes — mashed potatoes, soups and stews, roasted veggies, or eaten raw as classic French salad. The dish we made last night, and every year, involves juicing the celeriac – a profligate use of such a slow-growing vegetable! The resulting juice is lighly boiled with a little cumin, salt and pepper, strained and used as subtly flavored broth, delicious with mushrooms and broiled fish. We sprinkled the dish with little bits of greens, chives and herbs  from the hoop house. First and last harvest together. Lovely.
Unlike the celeriac, which was in perfect condition, the remaining pound or two of parsnips in the root cellar were starting to sprout and get pithy so I removed them too. I was all out of my favorite herbal tea ingredient — roasted dandelion root — so I decided to roast the parsnips for tea. It’s very easy and delicious.Â
Clean and trim the roots, cut them up coarsly and toss into a food processor to grind them up. Spread the finely ground roots onto cookie sheets that have been warming in the oven set to 300 degrees. Remove and stir the roasting roots every 15-20 minutes and when the roots are the color of black tea, they’re done.  Cool and store in a jar.   Make an infusion with boiling water just like any other herb tea, plain or mixed with other herbs. A nice after dinner tea.
As if the on-set of snow melt and warm weather didn’t bring enough garden activity, it’s also the time to start seeds indoors. I used to set up the grow lights and start my first round of seeds in February but now begin a month later. This saves energy (electrical and human) and reduces the amount of time the seed starting gear takes up space in the house. The timing seems to work just fine for the plants.
Yesterday I started a tray of peppers, eggplants, basil, marjoram, onions and celeriac.  Unless you have a heated greenhouse, fluorescent grow lights are pretty much a necessity if you want strong, stocky seedlings at this time of year.  Seedlings grown on a window sill usually end up leggy and weak. A heat mat helps to encourage quick germination — especially for the eggplants and peppers that are oh-so reluctant to emerge if they sense any chill. Once the plants are up, then it’s good to remove the heat and let them grow in cooler, 60 degree-ish temperatures.
I’ve learned to wait until April for starting tomatoes because they grow so fast and hog the prime real estate available under lights.  By the time they’re big enough for transplanting into larger pots in May, the trays of tomato plants can usually go out into the hoop house with a little added heat on cold nights.Â
That said, I did start a few tomato seedling in yesterday’s batch, just to see if we can coax some early tomato harvests. We’ve tried it in the past but found no advantage to the early planting.  Frosty nights created a lot of stress worrying about the losing the tomato plants, and they just didn’t look happy nor did they produce fruit significantly earlier than the tomatoes planted on our normal schedule. But hope springs eternal. I have some ideas for making it work better this time and if the unusually warm spring weather continues, perhaps we can ride the wave of global warming, picking a ripe tomato in June.
After a few sunny days, the snow melted and ground thawed sufficiently to insert hoops. Then covered with plastic and will leave in place until ground dries and can be worked for planting.
 Any kind of hoops can be used. These are PVC. 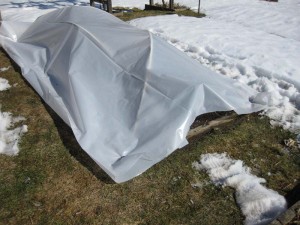 Cover bed fully to keep rain/snow out but leave ends loose so moisture can escape.  Then go find some snowdrops to admire!
Some thoughts to chew upon from my brother John, a professor of applied linguistics in Tokyo.
“Zest” is an interesting word–arising from citrus peel, but now extended to intentional and energetic living. The Ministry of Education Science and Technology here [in Japan] has translated its current educational ethos for children, ikiru chikara 生ãる力 as ‘zest for life’. I’m not sure if it really cuts it for children and adolescents–because zest is really meaningful when there is none or little of it.
Zest in cooking (as in citrus peel) is often unexpected as in mince pie crust or as yuzu peel in Kansai-style udon. The unexpected sense of zest might be the most powerful, as the fact that “truck farming” plants [wild crafted ginseng, described in the post below] are possible in the North, indicate.
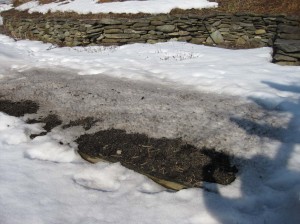 Wood ashes melting snow on bed prepared last fall for early spring planting. To take best advantage of the Zone 4 growing season, get started now — outside. The tenderest spinach, the crispest radishes and nuttiest arugula are grown in the cold. They can survive the inevitable returns to winter over the next couple months so it makes no sense to wait.
You can start planting the whole spectrum of cold hardy greens as soon as the ground thaws and dries out,a process you can accelerate with a few simple steps along with some inexpensive props.
- Remove the snow from area to plant.  Shovel it off, or on sunny days, just sprinkle surface of snow with wood ash, dark sand or fine compost (anything dark that’s compatible with the garden) and let the sun do the work.  Sprinkle just enough to absorb the sunlight without insulating the snow beneath.
- Cover with clear plastic so ground will thaw and prevent further rain or snow from being absorbed.
- Once thawed, dry the bed out by putting the plastic over hoops. Bent pvc pipe, manufactured metal row hoops, bent wire or whatever will get the plastic off the surface of the ground will work, just so hot air can circulate and moisture escapes.
- Work the soil and plant ONLY after soil in bed is no longer wet.  If you work soil when wet it will compact badly!  .
I’ll provide photos at each step so you can see. Others may have different approaches to making an early start. If so, please share them!
Â
 Lindsey with Rosemary Gladstar If you’ve dabbled in herbalism, you probably recognize Rosemary Gladstone and her role in helping to birth the herbal renaissance that we so benefit from today.  My young friend, Lindsey and I heard her speak in Burlington last night, showered with entertaining gems of wisdom from the sprightly master of herbs. But the main message  was dead serious — the need to protect and create sanctuaries for wild medicinal plants.Â
I had no idea that so many of the herbal products we buy today still come from wild sources. Imagine tractor trailer loads of ginseng and golden seal roots leaving the woods for the factory! Thanks to the popularity of herbal remedies many important medicinals, especially those with excruciatingly slow growth, arduous reproductive habits and picky about their habitat, are being lost. The solution:1) only buy herbal products that are cultivated organically, not wildcrafted and 2) plant and cultivate wild plants wherever you are.Â
The fabulous woodland edibles that will grace our tables in just a few more weeks — wild leeks and fiddleheads — are also slow-growing. They need our care and active support to avoid depletion.  Learn more at United Plant Savers.
 Sampling pure sap from first run. Yesterday we rushed home from work to tap the maples in our little sugar bush before dark. With a forecast of frosty nights in the teens and warm days well above freezing, it made no sense to wait.  Clear sap nearly poured out of the taps the moment they were inserted into the drilled holes, dropping into the metal buckets — ting, ting, ting — the sweet sound of spring in Vermont.   Â
After setting up our 20 buckets in less than an hour and well before nightfall, taking time to admire the golden light in the crowns of trees and the hot pink sunset reflected on the west-facing flank of Mount Mansfield, it occurred to me that our sugar bush is just the right size for us at this time. Any more and it would be a frustrating after-work chore rather than a fun way to tap the joyous energy of this season. Â
20 taps usually provide a year’s supply of syrup for our needs and for gifts. The daily sap collecting, especially after a long work day and commute, offers a nice bit of exercise.  20 taps also produce just about the right amount sap for boiling off in one day, so we don’t have to boil every waking hour of the weekend or late into the night as you might with with a larger operation.
It took a while to figure out the right size and configuration. With a whole hillside of sugar maples available to be tapped, it’s tempting to keep expanding, using tubes and upgrading the boiling rig. We tried tapping trees in various locations spread around our clearing until finally figuring out that it works best to focus on just one small area with the highest concentration of sugar maples and that 20 was the magic number.
Â
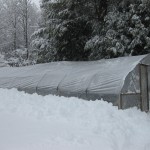 - hoop house in last week’s snow storm
Yesterday’s sun ignited temperatures close to 90 degrees in the hoop house. Soil is now fully thawed and the winter-weary plants are stretching out and starting to grow.  It felt incredibly good to putter around, weeding, planting, watering in the sun without a jacket.  Â
With the long range forecast showing outdoor temps above freezing every day for the next ten days, spring has officially arrived in the hoophouse! Today’s early morning temps outdoors were in the high 20’s, but the hoop house was a toasty 38 degrees.  Just one layer of plastic over conduit pipe hoops, supplemented by spun polyester coverings on the beds, creates an environment for plants that is closer to Virginia than Vermont. Â
Before discovering the Four Season Harvest system pioneered by Eliot Coleman, I hated March and April in Zone 4. Winter seemed never-ending and spring ridiculously short. Now, any time the weather goes above freezing, or the sun shines for an extended period, the hoop house warms up and I can indulge in the spring sensations we all long for at this time of year. Of course deep cold can return any time. In March the past several years we’ve had sub-zero temps and heavy snows that froze the ground in the hoop house and delayed early harvests until mid-late April. This year, perhaps the mild weather will bring an earlier season of fresh salads.Â
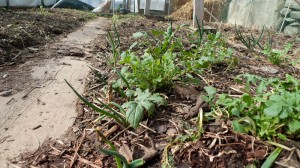 Survivors of winter - arugula and scallions. Focussing on cold hardy plants and giving them protection from cold, desiccating winds is the essence of the winter garden system. Coleman’s new book, Winter Harvest Handbook  differs from his earlier book in that it is full of glossy color photos. The book is geared for commercial growers but there’s much to inspire the home gardener, though I must say his overwintered plants look impossibly gorgeous. Mine survive the winter with a hangover.  Also our funky home-made hoop house little resembles his tidy and efficient greenhouses.  But hey, it works for us.Â
Continuous succession planting is another principle of the winter-garden system.  Since the later plantings of spinach, parsley and lettuce in the fall failed, I have been replanting as early as possible. Arugula and other mustard greens, cilantro, scallions, mache, chervil, kale, weren’t as attractive to voles so we’ll soon be able to harvest new leaves from those that wintered-over. Perennial plants like asparagus, chives, and sage, and fall plantings of garlic and shallots in the hoop house also produce an early crop. Over the next week or two I’ll be planting every remaining space in the beds with peas, fava beans, radishes, carrots and more greens of all kinds.
Every spring arrives with our bodies having aged another year. Squatting, lifting, pulling, and all the movements needed for gardening differ from those for winter sports or chores and are always tough for bodies that spend a majority of the waking hours sitting at desks or in cars. The result — spring brings sore and aching muscles and even acute agony. Not a great way to start the vernal celebrations.
Possibly the best garden prep at this time of year for anyone over 35 could be to drop those garden books, magazines and blogs and to move the old body instead. For me that means yoga practice. Now’s the time to strengthen the core, improve flexibility in the hips, stretch those Achilles tendons and breathe deeply into every cell. Since starting yoga ten years ago, my chronically aching back has transformed into a mostly pain-free back. An amazing improvement! Something I never thought possible, especially on the down slope of life.
Every body has different exercise needs and preferences and yoga may not work for all. But with classes so ubiquitous and with so many styles and levels available – if one class or teacher doesn’t appeal, there’s likely to be another that would. Even in my small town I’m lucky enough to have an excellent teacher and I supplement her classes with a wide range of online video classes from Vancouver available through subscription at MyYoga Online.com. When I can’t even get motivated for a short online class, a couple of sun salutation cycles in the morning and a little stretching in the evening before bed, seems to keep the worst of the aches and pains at bay. Like maintenance in the garden, a little effort every day keeps  the body in pretty good condition.
|
|


